Controls
Editing and managing controls
Editing control information
Opening control details
- Click on a control title in the overview
- The control details tab opens with various sections
- Details section contains all basic information and settings
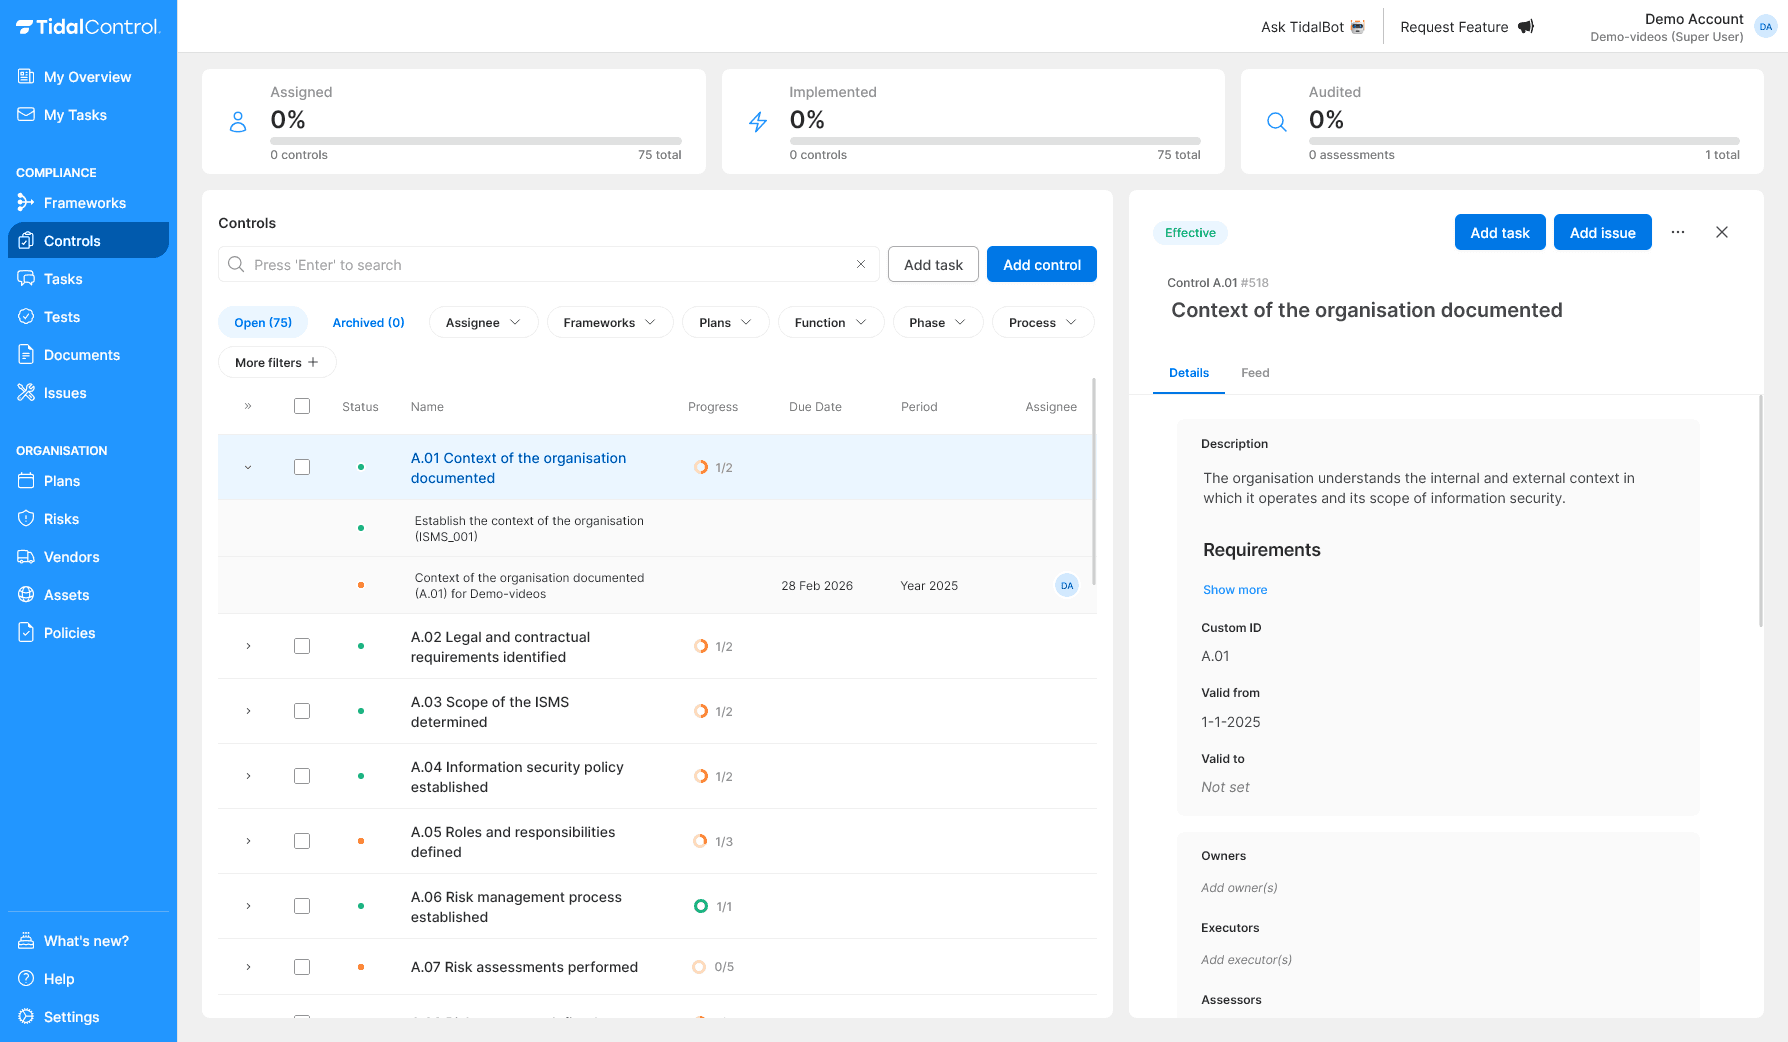
Editing basic information
Editable fields in Details tab:
- Name - Adjust control name
- Custom ID - Change for better reference
- Valid from / Valid to - Set validity period. Plans only create tasks for valid controls.
- Control Type - Change between Manual/Automated/IT-Dependent Manual. This is an optional control label.
- Description - For adding or adjusting the Control description
Buttons in Details tab:
- Archive - For archiving controls
- Delete - For permanently deleting controls
How to edit information:
- Click in the relevant field
- Adjust the text or selection
- Click the Update button bottom left or top right of the screen to save changes
Activate Controls to automatically create Tasks: Plans can only create automatic tasks for active controls.
A Control is "Active" when:
- The "Valid from" date is in the past and "Valid to" in the future or empty.
- At least one Asset is linked to the Control
- At least one Plan is linked to the Control
Framework References
What are Framework References? Framework References link your control to compliance standards like ISO27001, NIS2, or GDPR.
Benefits of framework mapping:
- Compliance tracking - Automatic progress for compliance standards
- Audit support - Clear traceability to requirements
- Reporting - Structured compliance overviews
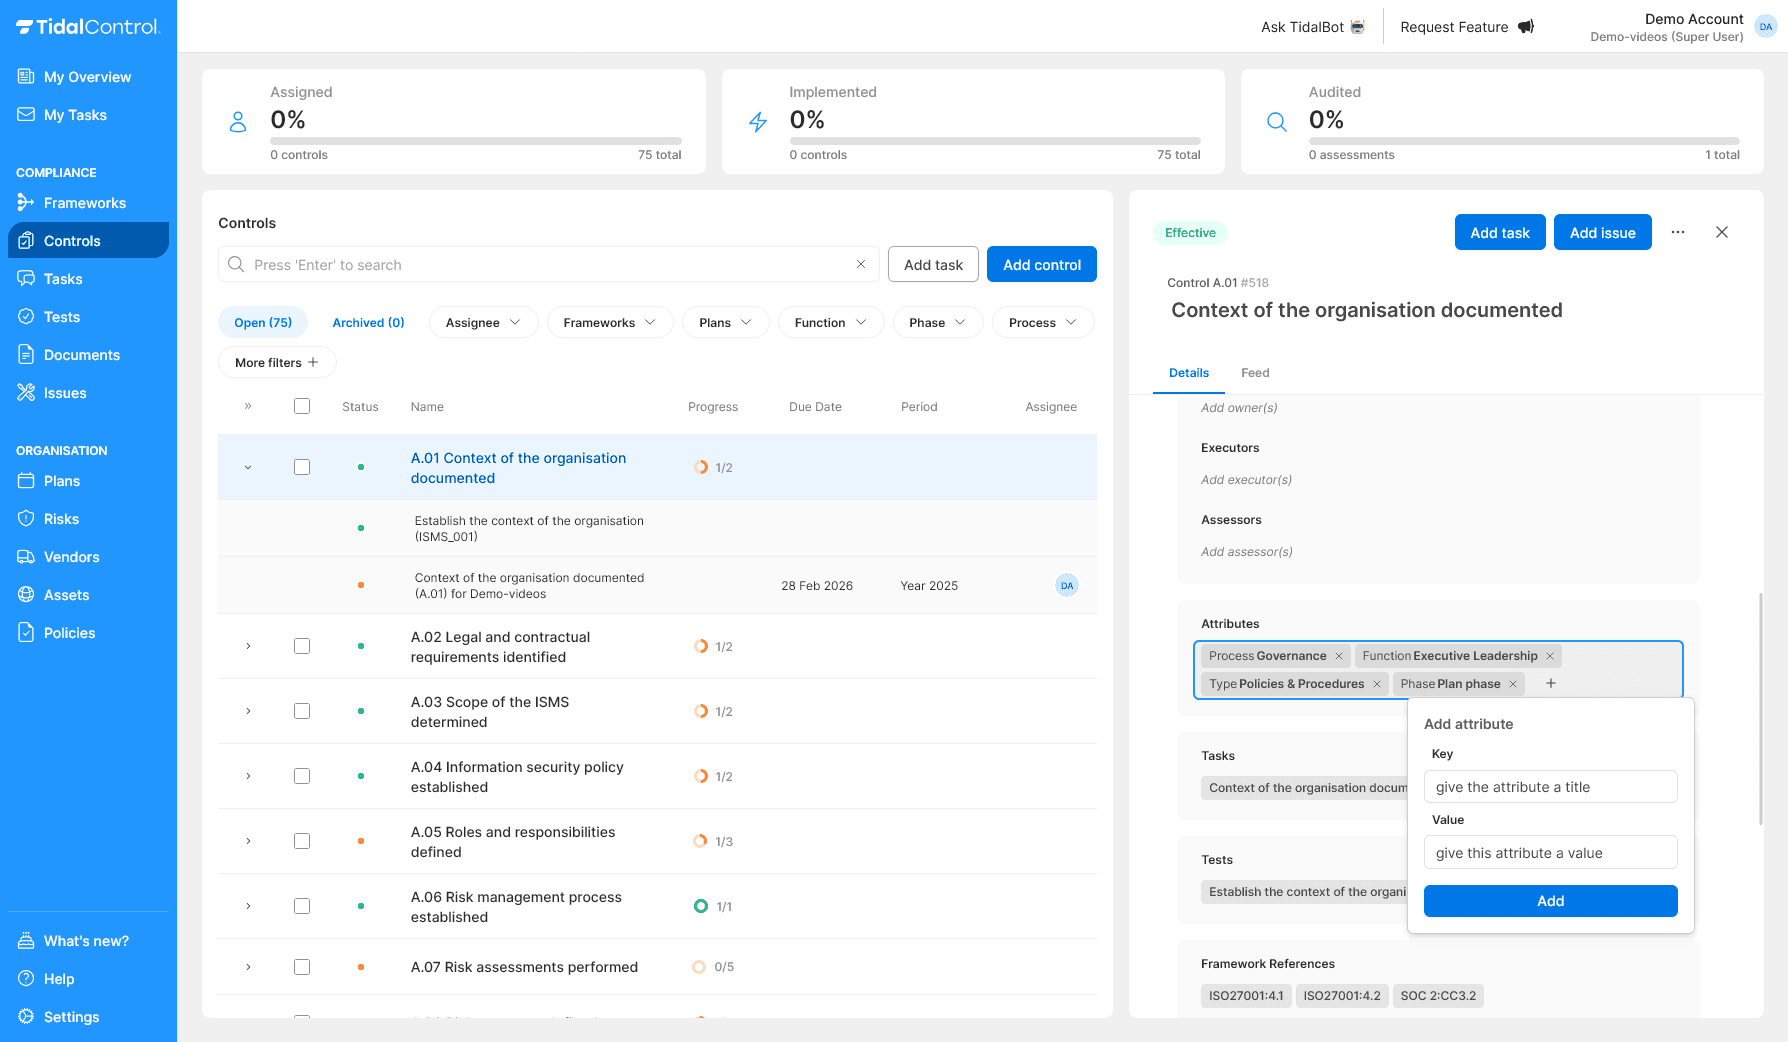
Creating control attributes
Adding attributes:
- Scroll to "Attributes" section
- Click "Add attribute"
- Fill in a title and select 'Add item' or press 'Enter' to save it.
- Fill in a value and select 'Add item' or press 'Enter' to save it.
- Click 'Add' to definitively add the attribute.
Removing attributes:
- Scroll to "Attributes" section
- Move mouse over attribute a trash can icon appears
- Click trash can to remove the attribute
Editing attributes: Create a new attribute with the correct information and then delete the 'old' attribute.
Reduce error-proneness and typos by selecting existing titles and values from the dropdown list (if used before) instead of typing yourself.
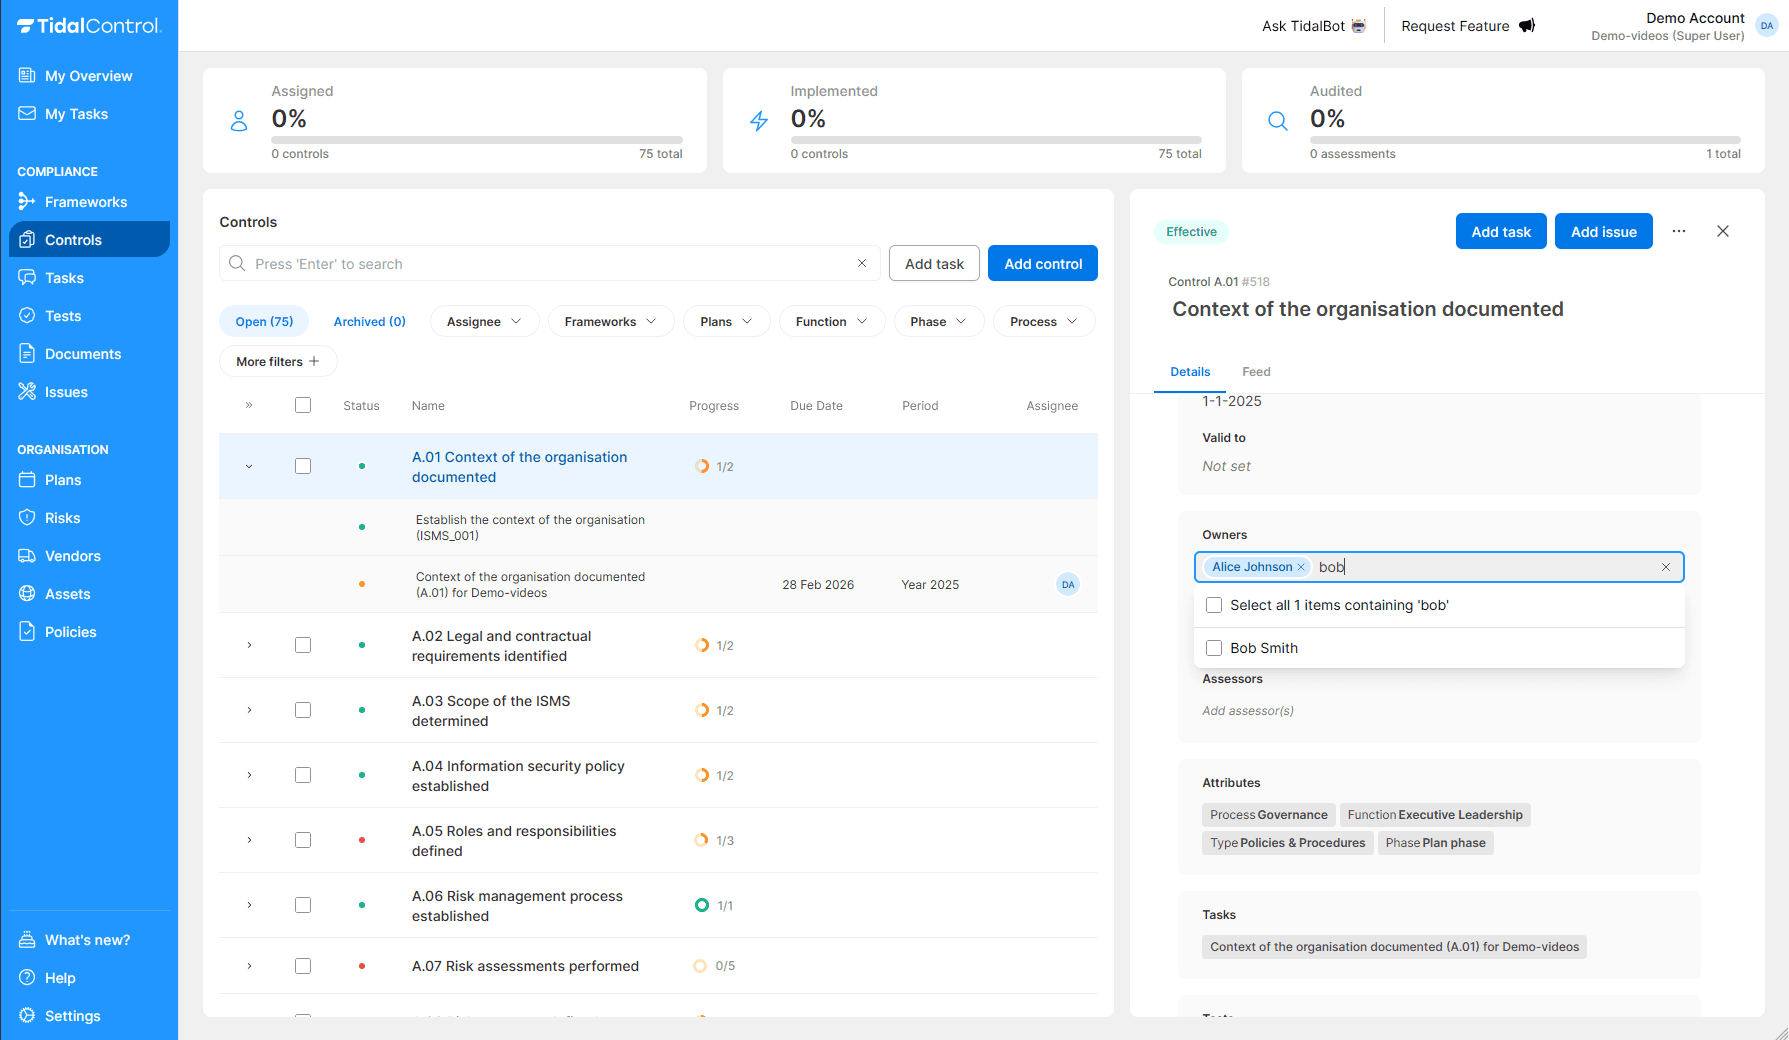
Assigning control owners
Assigning Owners:
- Find "Owners" section on the right side
- Click the user icon
- Type username and select from dropdown
- Multiple owners possible for shared responsibility
Setting Executors:
- People who perform execution tasks
- Automatically assigned to new manual tasks
- Often IT teams or operational staff
Assigning Assessors:
- People who perform assessment tasks
- Automatically assigned to assessment tasks
- Usually auditors or compliance officers
Role clarity: Owners are responsible for control effectiveness, Executors perform tasks, and Assessors evaluate whether controls work. One person can have multiple roles.
Relationships with other objects
Controls can be linked to other objects like assets, risks, and plans using the chip component interface. This provides a visual and intuitive way to manage relationships.
How the chip component works:
- Click to add - Click on empty chip areas to add new links
- Visual indicators - Linked objects appear as removable chips
- Quick removal - Click the X on any chip to remove the link
- Auto-save - Changes are saved automatically
Linking assets
Why link assets? By linking assets you establish which business resources this control applies to.
When using Plans, one task per linked Asset will be created by the Plan. By adding multiple Assets you can also subdivide tasks to Asset owners.
Linking assets:
- Go to "Assets" tab in control details
- Select relevant assets from the available list
- Links are automatically saved
Asset selection criteria:
- Relevance - Asset must actually be protected by control
- Proportionality - Critical assets require more/stricter controls
- Practical feasibility - Control must be realistically implementable on asset
Linking risks
Why link risks? By linking risks you establish which risks this control helps mitigate.
Risk-control mapping:
- Open "Risks" tab of the control
- Select relevant risks that this control helps mitigate
- Links help with risk management and impact analysis
Mapping strategies:
- Direct mitigation - Control directly reduces this specific risk
- Preventive effect - Control prevents this risk type
- Detective function - Control detects when this risk occurs
- Corrective measure - Control repairs damage from this risk
The controls you link to risks will reappear during risk assessment.
Determine during this risk assessment whether the linked measures still sufficiently mitigate the risk, or whether additional control links are needed.
Linking plans
Why link plans? Plans ensure that new Control tasks are created periodically (e.g. monthly, annually).
- Go to "Plans" tab of the control
- Select relevant plan from available schedules
- Automatic task creation starts according to plan frequency and schedule
Most common Plan types:
- Monthly Monitoring - Monthly checks
- Quarterly Testing - Quarterly validation
- Annual Review / Audit - Annual control assessments
Plan overload: Avoid assigning multiple plans to one control. This leads to excessive tasks and confusion about deadlines.
Control lifecycle management
Control activation and deactivation
Activating control:
- Set the "Valid from" date (today or earlier)
- Set the "Valid to" date (future)
- Link to a Plan
- Link to at least one asset
- Status automatically changes to "Active"
Deactivating control:
- Set "Valid to" date (today or earlier)
- Completed tasks remain visible for audit
- Planned future tasks are cancelled
- Status changes to "Inactive"
Archiving controls
When to archive:
- Control is permanently no longer applicable
- Framework requirement has expired
- Control is replaced by new version
- Organizational change makes control irrelevant
Archiving process:
- Select one or more controls with checkboxes in overview
- Click "Archive" button at top of table
- Confirm archiving - controls disappear from daily overview
- Historical data remains available for audit and reporting
Effect of archiving:
- Control appears in "Archived" tab
- All links are hidden but preserved
- No new tasks are created for this control anymore
- Compliance calculations and statuses don't account for archived controls.
There are several differences between activating and archiving:
- Activation (and Deactivation) happens automatically when the validity period starts or expires. Archiving is always manual.
- A control can be deactivated because necessary links with Assets and/or Plans are missing. Archiving is always manual.
- When a control is deactivated, links with assets, risks and tasks remain visible throughout the application. With Archiving these links are hidden.
Deleting controls
When to delete:
- Control contains sensitive information that may not be preserved
- Test setup with incorrect configuration that needs to be completely redone
- Duplicate controls that were accidentally created
- Organization requires permanent deletion of certain data
Deletion process:
- Select one or more controls with checkboxes in overview
- Click "Delete" button at top of table
- Make choice between automatically closing linked tasks or not
- Confirm deletion - definitive action that cannot be undone
Effect of deletion:
- Control is permanently removed from the entire application
- All linked tasks, tests and historical data are closed (if chosen)
- Links with assets, risks and plans are broken
- Audit trail and reporting history is lost
With deletion, the control can only be restored via a restore request to the helpdesk.
With archiving, restoration is possible via the 'Archived' tab, and then the 'Unarchive' option
Control templates
Using control templates
Predefined controls: Tidal offers templates for standard compliance frameworks:
ISO27001 controls:
- A.01 Context of the organization established
- A.02 Legal and contractual requirements identified
- A.03 Scope of the ISMS determined
- [...etc. complete set available]
Template benefits:
- Pre-filled descriptions - Professional control descriptions
- Framework mappings - Automatic compliance references to all applicable frameworks
- Recommended attributes - additional information that can be used for filtering and reporting
- Auditor tested - Proven effective control setup
Best practices for control management
Control naming
- Descriptive names - What exactly does the control achieve?
- Consistent IDs - Group related controls
- Avoid acronyms - Unless universally understood
Control monitoring
Regular reviews:
- Quarterly reviews - Control performance and relevance
- Annual assessments - Thorough effectiveness evaluation
- Incident triggers - Extra review after security incidents
- Framework updates - Adjustments after standard changes
Monitor the following performance indicators:
- Task completion rates - Percentage of timely completed tasks
- Test success rates - Percentage of successful automated tests
- Issue resolution time - Speed of problem solving
- Stakeholder satisfaction - Feedback from control testers
Continuous improvement
Control optimization:
- Automation opportunities - Which manual tasks can be automated?
- Frequency fine-tuning - Is current test frequency optimal?
- Risk-based scoping - Right asset coverage without overload?
- Regularly review available integrations - Better tool connections possible?
Change management:
- Impact assessment - Assess the effect of changes in controls on compliance (control-risk links)
- Communicate to stakeholders - Communicate changes timely
- Training updates - New procedures adequately trained
- Rollback planning - Use archiving and validity periods to be able to return to previous version if needed
Start small, build out: Begin with core controls for your most important assets and frameworks. Gradually add controls as your team gains experience and processes mature.
Next steps
Now that you can create and manage controls:
- Implement your first controls for critical business processes
- Set up automatic planning for regular validation
- Monitor control effectiveness via dashboards and reports
- Optimize configurations based on practical experience
For operational guidance on tasks and testing, see Implementing and testing controls
- Previous
- Creating Controls and Tasks