Assets
Creating and managing assets
Adding assets
Starting to add an asset
- Go to the Assets page via the main menu
- Click "Add Asset" at the top right of the overview
- The add form opens where you can fill in asset information
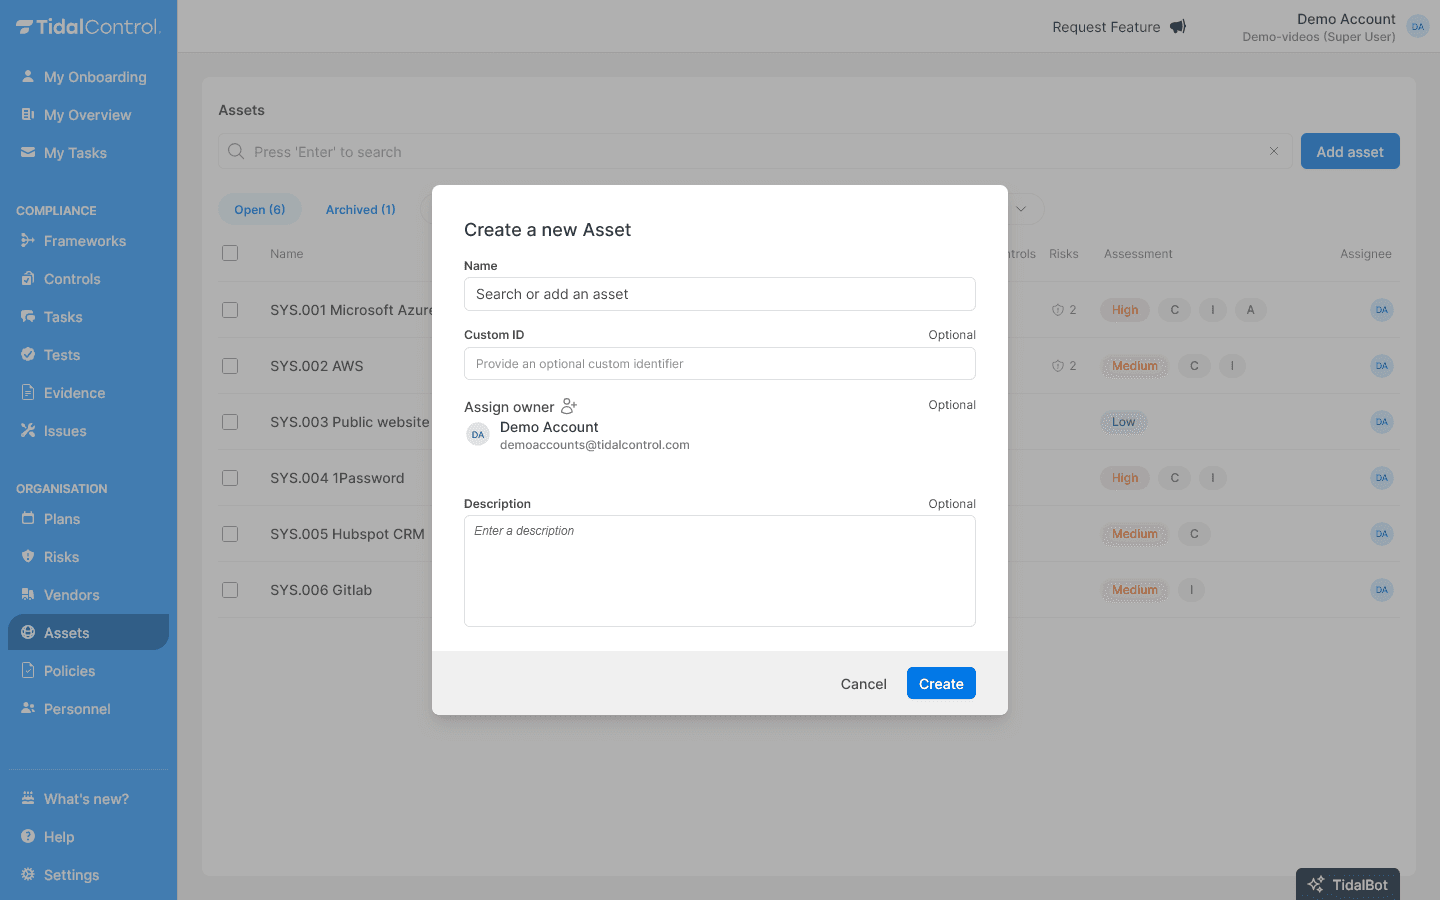
Filling in asset information
- Asset name - Choose a clear, recognizable name
- Custom ID - Your own reference number (useful for linking with other systems)
- Asset owner - Select the responsible person from the dropdown
- Description - Explain what this asset does and why it's important
Choosing clear names: Use names that everyone in your organization understands. Instead of "SRV-01" use "Microsoft 365 Email Server" or "Customer Database Production".
Using the predefined list
For common assets, Tidal offers a predefined list:
Searching the list:
- Type in the search field of the add form
- Suggestions appear automatically based on your input
- Select a suggestion to automatically fill in relevant information
Benefits of predefined assets: For these assets, the description field is already filled with useful information needed for assessing this vendor
Work is being done on a separate Vendors module with built-in vendor assessment.
Once this is introduced, information from predefined vendors will already be filled in advance.
Commonly used predefined assets:
- SaaS solutions - Microsoft 365, Google Workspace, Slack, Zoom
- Cloud platforms - AWS, Azure, Google Cloud
- Security tools - Antivirus, firewalls, backup systems
- Business software - CRM, ERP, HR systems
Not found in the list? No problem! You can add the asset to your list by pressing 'enter'.
Saving the asset
- Check all filled information
- Click "Create" to create the asset
- The new asset appears in your overview
- The impact rating is still empty - see Performing asset assessments
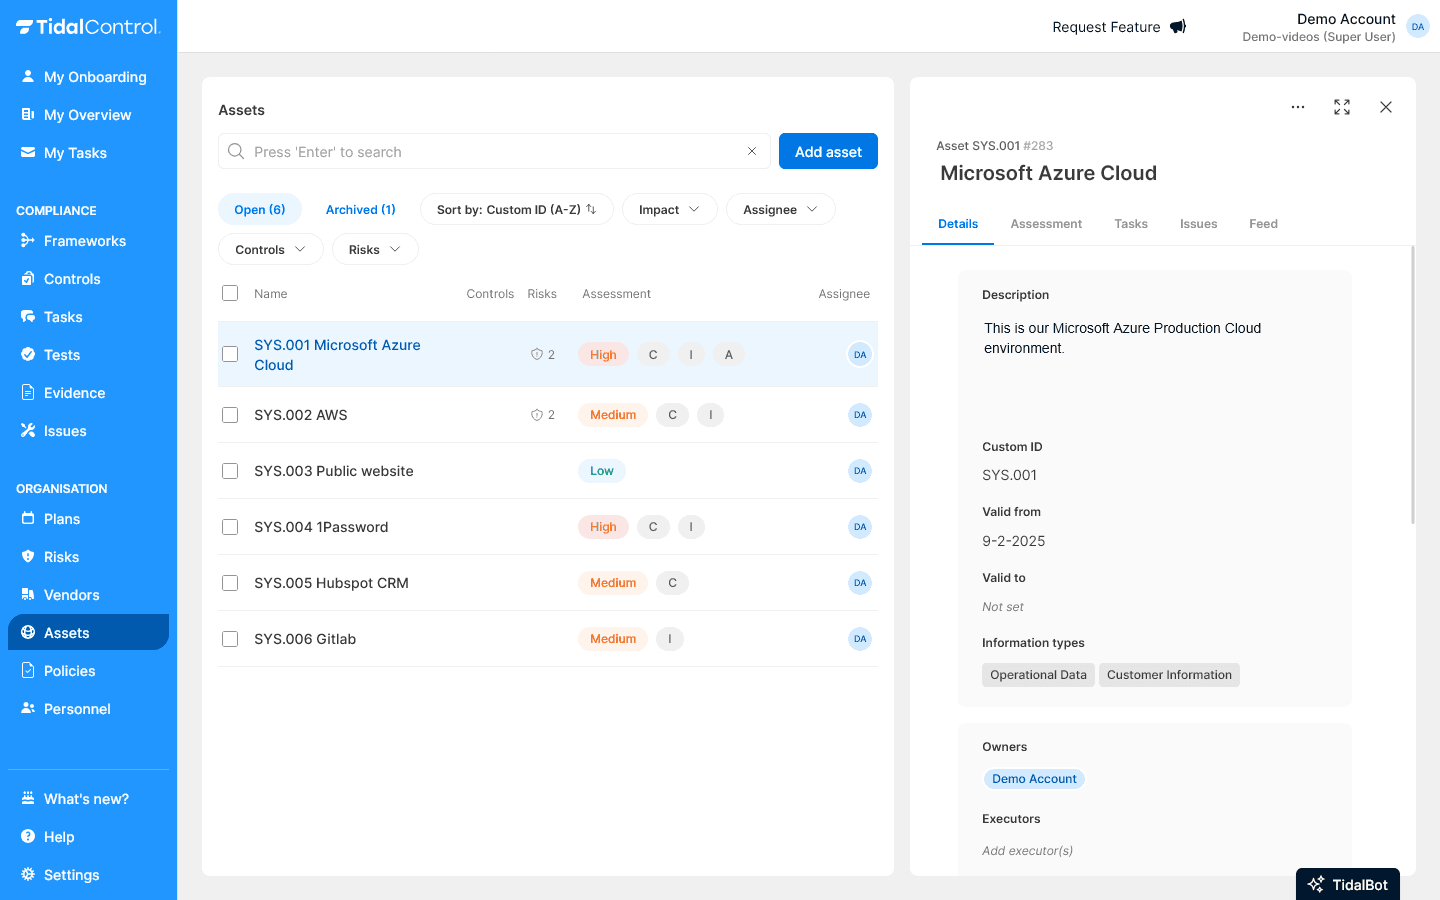
Editing and managing asset information
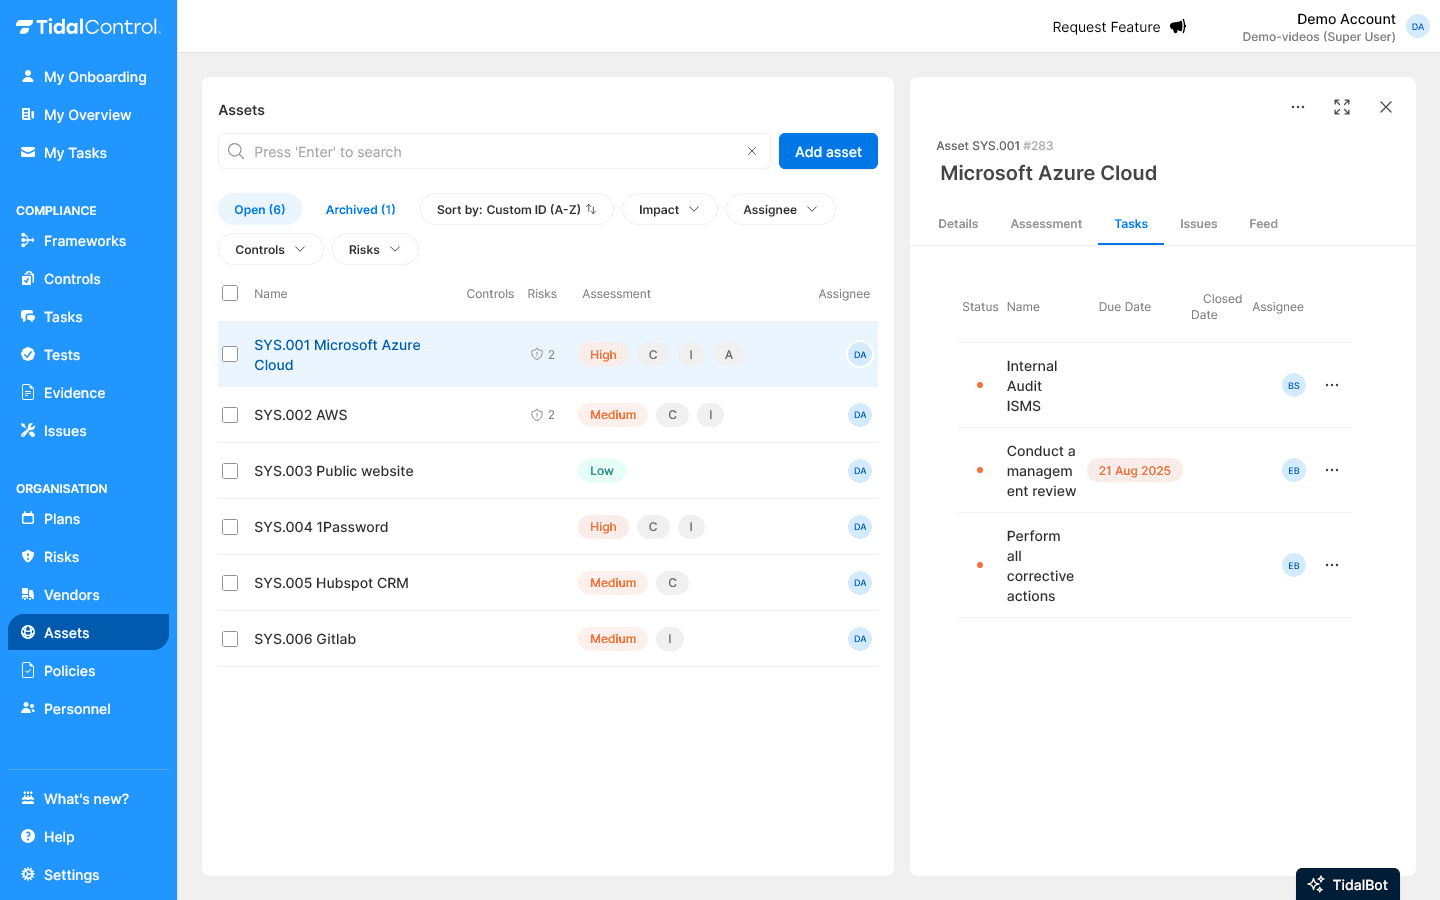
Opening asset details
- Click on an asset name in the overview
- Select the "Details" tab
- Here you see all asset information and editing options
Editing basic information
How to edit information:
- Click on the input field
- Adjust the text in the input field
- An 'Update' button appears - click this button to save changes
Setting information types
What are information types? Information types register what kinds of data this asset contains or processes.
Adding information types:
- Find "Information types" section in the Details tab
- Click on the dropdown menu
- Select relevant types such as:
- Customer information - For CRM and sales tools
- Financial records - For accounting systems
- Software Source code - For development environments
- Application Secrets - For (cloud) infrastructure
Multiple information types: Most assets contain different types of information. An HR system can contain both "Employee information" and "Financial records".
Adding attributes
What are attributes? Attributes are labels that help categorize and filter assets.
Adding an attribute:
- Find "Attributes" section in the Details tab
- Click "Add attribute"
- Fill in a title such as 'category'
- Fill in a description such as:
- Critical - For business-critical systems
- Cloud - For cloud-based assets
- Vendor - For externally managed systems
- Test - For development and test environments
An attribute is more than a label because it has both a value and a title in addition to a value.
This allows you to vary infinitely with attributes and group them.
Managing attributes:
- Reuse existing attributes for consistency
- Remove attributes by hovering over the attribute and choosing the trash can
- Use short, clear labels for efficient filtering
Assigning roles
Setting owners
What does an owner do? Owners are responsible for the asset and decide on changes, maintenance, and usage.
Owners are automatically assigned as Task Owner to new tasks for this Asset.
Assigning an owner:
- Find "Owners" section on the right side
- Click on the user icon
- Type a person's name and select them from the dropdown list
- Multiple owners possible - useful for shared responsibilities
Assigning executors
What does an executor do? Executors oversee solving tasks related to the asset.
Executors are automatically assigned as Contributor to new Execution tasks for this Asset.
Setting an executor:
- Find "Executors" section
- Select people who perform operational tasks
- Often IT teams or system administrators
Assigning assessors
What does an assessor do? Assessors evaluate the work of executors and report to owners.
Assessors are automatically assigned as Contributor to new Assessment tasks for this Asset.
Assigning an assessor:
- Find "Assessors" section
- Select people with control responsibilities
- Often managers or quality assurance teams
Authorizations: Read more about user roles and permissions in the 'Authorizations' section.
Archiving or deleting assets
When to delete:
- Asset is no longer used
- System has been phased out or replaced
- Vendor stopped providing services
- Hardware permanently taken out of use
When to archive:
- Asset is (temporarily) no longer in scope for compliance
- Deletion is not possible or desirable because historical data needs to be preserved
Archiving / Deletion process:
- Select one or more assets with the checkboxes on the left in the overview
- "Archive" and "Delete" buttons appear at the top of the table
- Click "Archive" or "Delete" to archive or delete all selected Assets
What happens during archiving:
- Asset disappears from daily overviews
- Links are made invisible but remain for audit trails
- Historical data preserved for compliance
- Can be restored later if needed
What happens during deletion:
- Asset disappears from the entire application
Archiving vs deleting: Archiving preserves all data for reporting and audit purposes.
When deleting, the Asset can only be restored via a restore request to the helpdesk.
Creating and managing links
Linking controls
Why link controls? By linking controls to assets, you establish which security measures apply.
Linking controls:
- Open an asset and go to the "Controls" tab
- Select relevant controls from the available list
- Updates are automatically processed
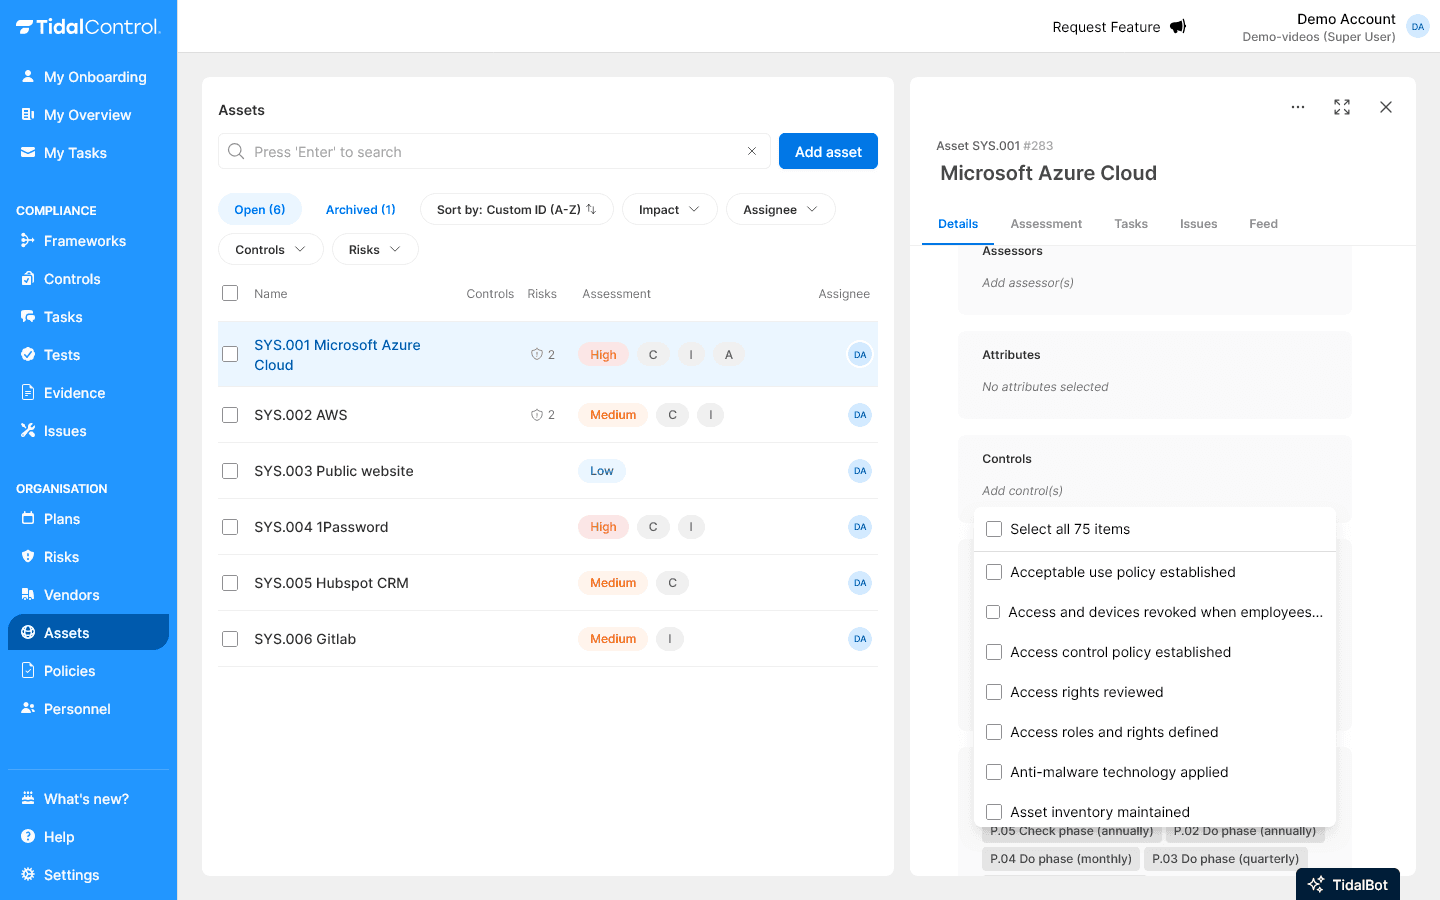
Relevant linking: Only link controls that actually apply to this specific asset. Too many links make the overview unclear.
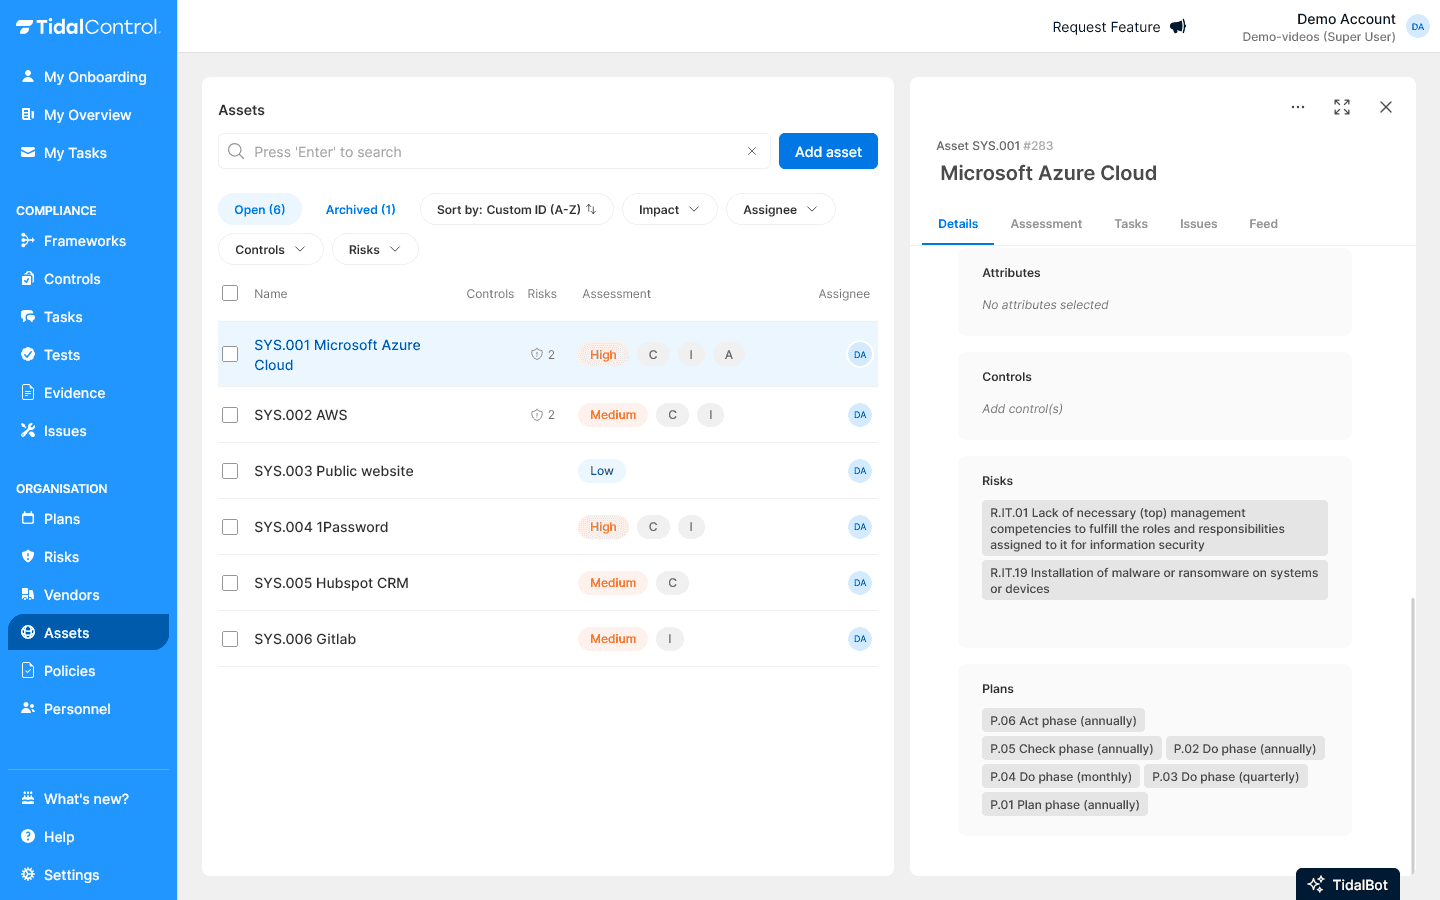
Assigning plans
What are plans? Plans are predefined schedules that enable automatic task creation for testing assets.
Assigning a Plan ensures that tasks are automatically created on this schedule for all controls linked to this Asset. These tasks are assigned to the Asset owners and contributors.
Linking a plan:
- Go to the "Plans" tab of the asset
- Select relevant plans from the available list
- Updates are automatically processed

Although it's possible to assign multiple plans to an Asset, this often leads to too many tasks.
Connecting risks
What are risk links? Risk links indicate which risks are relevant for this Asset.
This again helps determine the controls that should apply to the asset.
Managing risk links:
- Open the "Risks" tab of the asset
- Select relevant risks from the available list
- Updates are automatically processed
Monitoring issues
Issue tracking:
- Go to the "Issues" tab
- View open problems related to this asset
- Follow up on issue status and resolution

Tracking tasks and progress
Viewing tasks:
- Open the "Tasks" tab of the asset
- See linked tasks and their status
- Monitor progress of tasks assigned for this asset
Best practices for asset management
Organizational structure
Consistent naming:
- Use clear, descriptive names
- Apply standard prefixes for categories
- Avoid technical abbreviations that not everyone understands
Owner assignment:
- Assign at least one owner per asset
- Ensure backup owners for critical assets
- Update ownership during organizational changes
Maintenance workflows
Regular reviews:
- Plan annual asset reviews
- Check link relevance
- Update asset information when changes occur
- Archive unused assets
Documentation consistency:
- Keep descriptions current
- Document important changes
- Link to external documentation where relevant
Start small, build out: Begin with your most critical assets and gradually build your asset register. Completeness comes with time, accuracy is important from day one.
Next steps
Now that you can create and manage assets:
- Perform assessments for impact and risk assessment
- Monitor compliance status via linked controls
- Track performance through tasks and issues
- Generate reports for management and auditors
- Previous
- Getting started with Assets