Risks
Getting started with Risks
The Risks page shows every risk in your organisation twice over: as an inherent level before any measures, and as a residual level after them. This article covers reading that overview, the two heatmaps, and the status Tidal derives for each risk.
Navigating the Risks page
Each row carries an inherent level, a treatment decision, and a residual level, and the two heatmaps above the table plot all of them at once.
Opening the Risks page
Go to the Risks section via the main menu. You'll arrive at an overview page where all risks from your organisation are displayed.
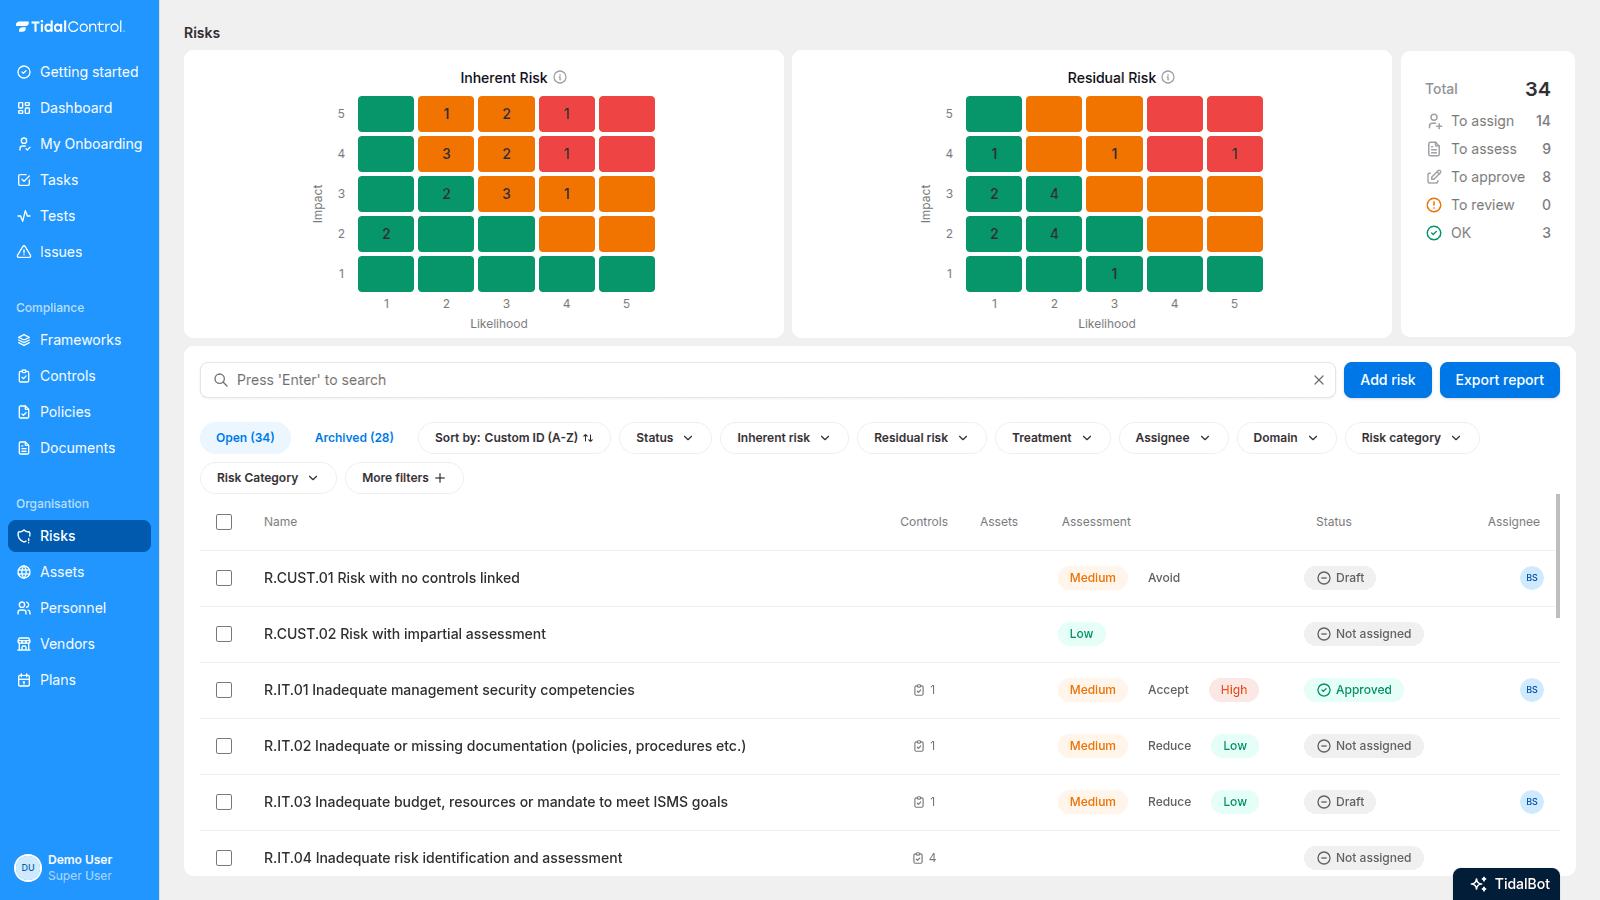
What you see in the overview
The risks overview shows important information per risk:
- Risk ID and title - Unique identification and descriptive name
- Inherent risk level - Risk level before measures (orange badges: High, Medium, Low)
- Treatment - Chosen treatment option (Reduce, Accept, Transfer, Avoid)
- Residual risk level - Risk level after measures (green badges: Low, Medium, High)
Understanding risk status
The status column indicates where each risk is in the assessment workflow. Tidal automatically determines the status based on the following criteria:
Not assigned - Risk has no assignee
Not started - Risk has an assignee but the assessment has not been started yet
Draft - Risk has an assignee and assessment is in progress but not yet approved
Approved - Assessment approved within the last year
To be reviewed - Assessment was approved more than a year ago
Archived risks are no longer actively managed but remain accessible via the "Archived" tab for audit purposes.
Risk heatmap
The Risks page displays two 5×5 heatmaps side by side: Inherent Risk (left) and Residual Risk (right). Each heatmap plots risks on a grid of Likelihood (1-5) versus Impact (1-5).
- Each cell shows the number of risks at that likelihood/impact combination
- Cell colors indicate the risk level based on the score (Likelihood × Impact):
- Green (Low): score 1-6
- Orange (Medium): score 7-15
- Red (High): score 16-25
- Hover over a cell to see arrows showing how risks move from their inherent position to their residual position
The heatmap uses the latest approved assessment for each risk. If no approved assessment exists, the draft assessment is used as a fallback.
Interpreting risk levels
Every risk is scored twice, before and after its measures, and each score gets a colour band. The gap between the two is what tells you whether your controls are doing anything.
Inherent risk vs Residual risk
Tidal distinguishes two important risk levels:
Inherent or Gross Risk:
- The risk level without any protective measures
- Shows the "raw" threat to your organisation
- Assessed on likelihood × impact
Residual risk:
- The risk level after implementing measures
- Shows how much risk remains after mitigation
- Determines if additional measures are needed
Risk level colors
Red means act now; green means periodic monitoring is enough.
High - Red:
- Immediate attention required
- Can cause significant damage
- Priority for risk treatment
Medium - Orange:
- Monitoring and planning needed
- Moderate impact on organisation
- Treatment within reasonable timeframe
Low - Green:
- Acceptable risk level
- Periodic monitoring sufficient
- Low priority for additional measures
Risk Acceptance Level: Acceptable risk levels differ per organisation. Determine together with management which residual risk levels are acceptable for your context.
Read more about risk acceptance levels and how to maintain them in Tidal in Creating and editing risks
Searching and filtering
Search matches risk names and custom IDs. The filters narrow by attribute, linked asset, linked control, and assignee, and they combine with each other.
Search functionality
Nothing filters until you press Enter; there is no live-as-you-type result.
Using the search bar:
- Click in the search bar at the top of the overview
- Type risk names or custom IDs (e.g. "R.IT.01" or "malware")
- Press 'Enter' and your search results are displayed
Filter options
Use the filter dropdown menus to find specific risks:
Open vs Archived:
- Open - Active risks being monitored
- Archived - Risks that are no longer applicable
Filter by Attribute:
- Show risks with specific characteristics
- For example domain, risk category, or vulnerability group
- Useful for thematic risk analysis
Filter by Assets:
- Show risks linked to specific assets
- Useful for asset-based risk assessments
Filter by Controls:
- Show risks mitigated by specific measures
- Helps assess control effectiveness
Filter by Assignee:
- Show risks assigned to specific people
- Useful to see your own responsibilities
Filter by Sort:
- Oldest/Newest - Chronological order
- Custom ID (A-Z/Z-A) - Alphabetical by ID
- Name (A-Z/Z-A) - Alphabetical by name
You can also create your own filters with attributes. For example, add a "Department" attribute to filter risks per department.
Read more about attributes in Creating and editing risks
Combining multiple filters
You can use different filters simultaneously for very specific results:
- Example: Filter on "Information risk" + "High" inherent risk + your name as assignee to see your high-risk IT risks
- Reset filters: Click away individual filters or refresh the page
What counts as a risk
Risks are identified threats and vulnerabilities that can impact your organisation. The system helps you systematically assess and manage these risks by:
- Risk identification - Mapping threats and vulnerabilities
- Impact assessment - Estimating likelihood and consequences
- Risk treatment - Accept, avoid, reduce or transfer
- Control linking - Assigning measures to mitigate risks
- Monitoring - Tracking progress of risk treatment
By registering and monitoring risks in Tidal, you gain insight into your risk profile, which measures are effective and where additional action is needed.
Risks can be linked to assets, controls and treatment plans. This creates a complete picture of which threats apply where and how effective your protection is.
Read more about this in Conducting Risk Assessments
Next steps
Now that you know how to find and interpret risks, you can:
- Conduct risk assessments for identified threats
- Link controls to risks for mitigation
- Manage asset-risk relationships for complete coverage
- Create and monitor risk treatment plans
No risks visible? This may mean that no risks have been identified yet in your Tidal environment. Start by adding your first risk via the "Add risk" button, or import a risk framework template.
- Previous
- Troubleshooting & FAQ